Ahem. There will be no WIP Wednesday this week because I am the ultimate klutz. It's true. My husband is constantly saying "oh Lisaleh" after I walk into a door, stub my toe on a piece of furniture that HAS NOT MOVED or trip on my own feet.
Last Friday, while cutting eggplant for dinner, I sliced open my baby finger. It hurt like a b@*#h! It also bled. A lot. So much that we called Telehealth Ontario to see if it needed to be treated. It did. I got three stitches. I was impressed by how quickly we were seen at emerg. I was in and out of there in less than three hours. I guess there weren't any major accidents or happenings that particular evening. My brother and sister in law were visiting and pulled together a lovely shabbat dinner for us based on what was left in progress in our kitchen. They rock!
The downside of stitches in my pinkie is that crafting (and typing for that matter!) is more difficult that usual. Not much is getting done around here.
Oh! I must go! Levi is making his poopy face! I hope your week has been more productive than mine.
Wednesday, September 21, 2011
Wednesday, September 14, 2011
WIP Wednesday: It's Still Wednesday Right?
This is going to be short and sweet because, well, I'm exhausted, and also, my computer keeps rejecting the disk containing all of the pictures I'm taken this week. So annoying!
I've had a crazy productive week in terms of crafting, which required a trip to Fabricland. I picked up some cute new flannels, terrycloth and ribbons (for Levi's Lovie, which you've seen already).

I made three pairs of baby carrier Suck Pads. I took a ton of photos with thoughts of posting a tutorial or just to show my process. Perhaps I'll write that up some time, but not tonight. For the first set, I used ribbon tape and a thick towel that I cut up. Sewing the ribbon tape on sucked. There must be a way to do it properly with a sewing machine and if I really wanted to figure it out I'd get googleing but...meh. Velcro works like a charm for this project. I'll tackle ribbon tape another time.
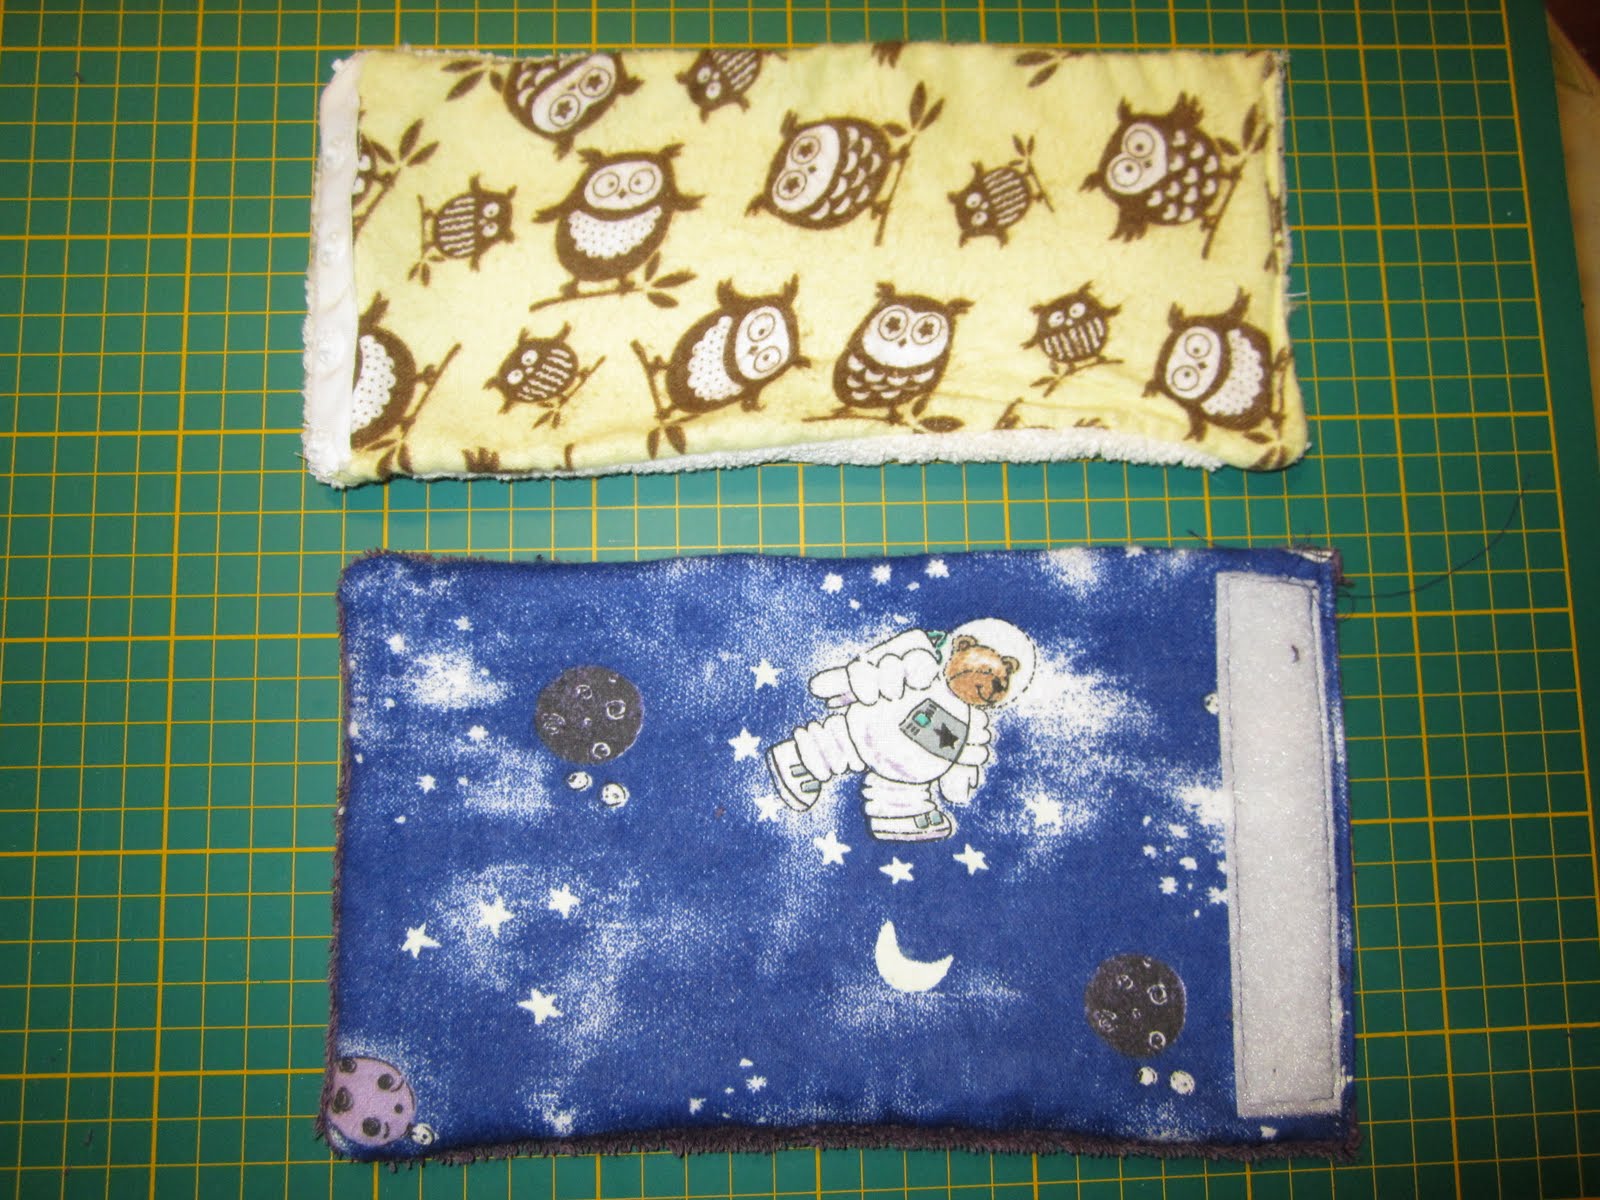
 For my second pair I used a purple towel and some cute blue "bears in space" flannel a friend gave to me. And Velcro. Unfortunately, this Velcro was sticky on the back which my machine did not appreciate. I've since purchased proper Velcro (as an aside, did you know that generic velcro is called hook and loop fasteners? Neither did I.). On my second attempt I made the pads taller. They are also shorter (end to end), due to the velcro having more width than the ribbon tape. Working with real towels was really messy, hence my having purchased terry cloth. Despite this, I'm really happy with version two and plan on gifting them to a family with a new baby next week.
 I finished up a soother clip that I had begun many weeks ago. It's great! Soother clips (the strip part) are Levi's favorite chew toy (um, that makes him sound like a puppy instead of a baby...) so we
really need to have multiples. I hope to make a few more in the coming weeks.
I finished up a soother clip that I had begun many weeks ago. It's great! Soother clips (the strip part) are Levi's favorite chew toy (um, that makes him sound like a puppy instead of a baby...) so we
really need to have multiples. I hope to make a few more in the coming weeks.

I made Levi a bib as a test run for one I wanted to give as a gift. I created a template pattern using some cheap white cloth fabric that I inherited. It has a touch of wonkiness to it, one "strap" being thicker than the other, but I think this adds a fun homemade quality to it.
And finally, I made a baby gift set for my friend Sara of Sweet & Crunchy (go check out her WIP Wednesday contribution. She's busy prepping her kids room for a new addition). Along with a bib and suck pads, I made a reversible receiving blanket.

Okay, there are still fifteen minutes left of this Wednesday! I'm off to link up with Freshly Pieced.

I've had a crazy productive week in terms of crafting, which required a trip to Fabricland. I picked up some cute new flannels, terrycloth and ribbons (for Levi's Lovie, which you've seen already).

I made three pairs of baby carrier Suck Pads. I took a ton of photos with thoughts of posting a tutorial or just to show my process. Perhaps I'll write that up some time, but not tonight. For the first set, I used ribbon tape and a thick towel that I cut up. Sewing the ribbon tape on sucked. There must be a way to do it properly with a sewing machine and if I really wanted to figure it out I'd get googleing but...meh. Velcro works like a charm for this project. I'll tackle ribbon tape another time.


I made Levi a bib as a test run for one I wanted to give as a gift. I created a template pattern using some cheap white cloth fabric that I inherited. It has a touch of wonkiness to it, one "strap" being thicker than the other, but I think this adds a fun homemade quality to it.
And finally, I made a baby gift set for my friend Sara of Sweet & Crunchy (go check out her WIP Wednesday contribution. She's busy prepping her kids room for a new addition). Along with a bib and suck pads, I made a reversible receiving blanket.

Okay, there are still fifteen minutes left of this Wednesday! I'm off to link up with Freshly Pieced.
Tuesday, September 13, 2011
A Lovie For Levi
What is it about tags that babies love so much? If there's a tag on a toy we give him, Levi goes straight for it. He flicks it with his fingers, sucks on it, and sometimes just stares at it. I'd love to know what he's thinking of when he's looking at it with such deep concentration!
I know Levi is not unique in his love of tags, because there are a ton of tag blankets for sale on Etsy and tutorials online (just google "ribbon tag blanket" and you'll find hundreds of them).
Yesterday, I made Levi his very own Lovie (aka security blanket with tags). It took about an hour to complete. Well, maybe a bit longer because, have you ever tried to find the grain line in flannel fabric? Ugh! Flannel gets totally stretched out and distorted and it's hard to put a thread through to find the grain. I persevered though and am pleased with the outcome.

Here's how I made Levi's Lovie:
Materials:
Two pieces of flannel fabric (I made mine 14 inches by 18 inches, but if I were to do it again I'd make it square)
Four different ribbons in a variety of widths
Iron
Sewing Machine
Thread
Pins
Process:


Note: I didn't take pictures of the process. My bad! But there are a ton of tutorials on the web. I referred to this one on Craftster.org.
Oh, and I'm linking up with Tip Junkie's Tip Me Tuesday this week. Check it out!

I know Levi is not unique in his love of tags, because there are a ton of tag blankets for sale on Etsy and tutorials online (just google "ribbon tag blanket" and you'll find hundreds of them).
Yesterday, I made Levi his very own Lovie (aka security blanket with tags). It took about an hour to complete. Well, maybe a bit longer because, have you ever tried to find the grain line in flannel fabric? Ugh! Flannel gets totally stretched out and distorted and it's hard to put a thread through to find the grain. I persevered though and am pleased with the outcome.

Here's how I made Levi's Lovie:
Materials:
Two pieces of flannel fabric (I made mine 14 inches by 18 inches, but if I were to do it again I'd make it square)
Four different ribbons in a variety of widths
Iron
Sewing Machine
Thread
Pins
Process:

- Cut your fabric and press it.
- Cut your ribbon. I cut eight strips of each of my four ribbon choices. I cut them four inches long.
- Place your fabrics together right sides facing in.
- Make a loop with a length of ribbon and pin it in between your two fabrics with the ends facing OUT. Pin the ribbon. Continue to pin the ribbons between your fabrics, spacing them out in a pleasing manner.
- Sew your fabrics together with a 1/4 inch seam allowance, leaving a three inch space open so that you can turn the Lovie right side out.
- Press your seams open (optional, but worth it!). At the same time, clip your corners to reduce bulk.
- Turn the Lovie right side out and sew the open space closed, either by hand or machine (I did mine by machine and added two ribbons in the space).
- Press.
- Give to your little one for endless entertainment.

Note: I didn't take pictures of the process. My bad! But there are a ton of tutorials on the web. I referred to this one on Craftster.org.
Oh, and I'm linking up with Tip Junkie's Tip Me Tuesday this week. Check it out!
Sunday, September 11, 2011
Weekend in Photos

New soother clip...

And suck pads for the Ergo (tutorial pending).

Walks in the neighbourhood...

And bouncing in a new bib.
Wednesday, September 7, 2011
WIP Wednesday: The Piecework Edition
This is going to be a quick update, because Levi is sleeping and I could be sewing as we speak! The only thing I worked on this week (besides the whole koshering my kitchen adventure) was my Watch Me Grow Chart.
I snuck in some cutting time in the early evenings this week, 15 minutes here, 20 minutes there.

Once I finished, I decided to sew a third length of jelly roll strips together. One of the fabrics in the roll had four different patterns within it, like so:

Instead of using four strips, I used five. I used a blue, green and red strip and then took half an red strip and half a yellow. I repeated a green, yellow and orange fabric floral pattern (the first and third piece below is cut from the new third strip). My backing fabric is yellow and orange so I wanted make sure these colours were well represented. I'm going to make bias tape from the backing fabric as well.

Levi kept me company while I played with the arrangement and pinned my pieces.

And that's as far as I've gotten. I'm about to start seaming my two long strips together. Right NOW before the baby wakes up! I'm not even going to proofread because time is running short!
Sara is making cute Tie Napkins as decorations for a party. Take a look!
And be sure to check out what other crafters are doing this WIP Wednesday on Freshly Pieced.
Tuesday, September 6, 2011
I have a Kosher Kitchen?! Me?!
We kashered our kitchen this weekend. This is a BIG DEAL. You see, I have never had a kosher kitchen. I was raised in the Reform movement (including attending URJ camp and holding leadership roles in a NFTY youth group). The Reform stance on kashrut is that we have the
power to make individual choices (based on knowledge and learning) in matters of ritual law. There's a
wide range of practice among Reform Jews, but the majority of the
families I grew up with were "Kosher Style" at home. No pork (but
pepperoni on pizza might make an appearance). No shellfish and no blatant mixing of milk
and meat. Out of the house, anything goes. When I was 6 or 7 Mom bought bacon, when Dad was on a business trip. It was a secret and therefore, thrilling. As we got older, I recall that our Kashrut observance relaxed. I remember having cheese on my chili and cheeseburgers in the summer. My parents have returned to Kosher Style observance in the last couple of years.
In my twenties, kashrut was not even on my radar. I was recovering from the havoc that undiagnosed celiac disease wrought on my body. Finding gluten-free food was so much harder a decade ago! It's trendy now, which is great because there are so many more GF products on the market. I disgress. The point is, if I was thinking about food, it was about if it had gluten in it, not if it had a hechsher.
So why a kosher kitchen? Why now?
I came to this decision over the summer, when hosting friends and family in our home. My husband brought a set of kosher milk dishes and utensils into the relationship which I'd haul out when prepping for certain guests. I'd always find I was missing some key kitchen tool while prepping these meals and I found this very annoying. I'd end up running to the store in the middle of preparing a meal to buy a strainer, whisk or measuring spoon. I didn't resent ensuring the meal I served was kosher, but it drove me crazy having to source kitchenware at the last minute.
I came to this decision over the summer, when hosting friends and family in our home. My husband brought a set of kosher milk dishes and utensils into the relationship which I'd haul out when prepping for certain guests. I'd always find I was missing some key kitchen tool while prepping these meals and I found this very annoying. I'd end up running to the store in the middle of preparing a meal to buy a strainer, whisk or measuring spoon. I didn't resent ensuring the meal I served was kosher, but it drove me crazy having to source kitchenware at the last minute.
Thus, the first reason to make the switch was for community. We want all of our Jewish friends and family to be comfortable eating in our home. I also appreciate that keeping a kosher home links me to our communal history and traditions. I knew that the initial switch would be labour intensive and it would be expensive to replace our dishes and tools, but once we were done, cooking for friends would be so much easier.
Reason number two is that it once our kitchen was kashered, it wouldn't require much effort for me to maintain a kosher kitchen on a day to day basis. DH says this isn't really a reason. But since I'm not keeping kosher for spiritual reasons or because it's halachically required, it needed to not be particularly onerous for me to make the switch. Most people who don't keep kosher consider it a complicated endeavor. So why doesn't it require effort, you might ask?
Reason number two is that it once our kitchen was kashered, it wouldn't require much effort for me to maintain a kosher kitchen on a day to day basis. DH says this isn't really a reason. But since I'm not keeping kosher for spiritual reasons or because it's halachically required, it needed to not be particularly onerous for me to make the switch. Most people who don't keep kosher consider it a complicated endeavor. So why doesn't it require effort, you might ask?
- DH is a vegetarian so I rarely have meat in the house. I cooked a ton when I was pregnant due to iron cravings, but I can't remember any other time I've make a meal dish since we began living together. Our kitchen is now strictly milk/pareve.
- There are good gluten-free brands with hechshers, easily available in downtown Toronto, which is important as a celiac.
- I try to reduce the amount of processed foods we eat and fresh foods don't need certification.
Finally, my third (and most important) reason is that it makes my husband very happy. I came to this decision on my own. I didn't actually talk it out with him, which is unusual because talking things through is how I work out how I feel about them. But I didn't want to raise his hopes or get him excited unless I was sure.
I'm surprised by how excited I am to have taken this step. I'm curious to see if it will have a spiritual impact for me. Time will tell.
The actual process of kashering the kitchen had some very fun upsides and some sad downsides. I think I'll make that another post. Stay tuned.
Friday, September 2, 2011
Communal Crafting
I just finished reading an article by Emmy on her blog The Student/Teacher, in which she reflects on the online sewing community. Her post is inspired by Tilly's article titled "Creativity in every Home: What Can the Cultural Sector Learn from Dressmaking blogs?" Both women comment on how the sewist network is self-led and there is no division between amateur and expert. This confirmed my recent realization that a great many of the quilt and sewing blogs that I've begun to follow in the last few months are written by women who began crafting and blogging simultaneuously. Their blogs weren't created to showcase handiwork that they'd been creating quietly at home, but to engage in a community and learn to craft together. One of the ways they do this is by carefully documenting their creative process, often in tutorial form. In fact there is even a process pledge that 707 bloggers have taken! Check it out.
This led me to reflect on what I want to achieve with my own blog. Frankly, when I started the blog, I just wanted someplace to indulge the "show-off" in me, "Look at what I made, isn't it (and aren't I) amazing!". But as I become more engrossed in the various blogs I follow, I find myself wanting to contribute and become part of this community. But how? I'm not a strong photographer and this isn't a skill I'm interested in improving (I'd rather be crafting!). I'm not doing anything innovative or worthy of a tutorial. And I don't want to become a professional blogger or spend any money or time making my blog design more attractive. I need to think more about this, but my initial thought is that I should just comment more frequently on blog posts that I appreciate, post more photos in flickr groups and maybe join some swaps or sew-a-longs. The last idea isn't something to take lightly though because I'm not big on commitment and I don't want to make promises I can't keep!
What do you think? Are you involved in the craft blog community? How do/did you engage?
Subscribe to:
Comments (Atom)